
- Sound
- Audio Mixer
- Audio Recorders
- Audio Snakes
- DJ Gear
- Headphone
- ENG Mixers
- Generators
- Intercom System Rental
- Musical Equipment
- PA System Rental For Events
- Pipes & Drapes Rental
- Podium
- Polycom Rental
- Presentation Equipment
- Press Box Rental
- Push To Talk Conference Mics Rental
- Sound Systems
- Speakers
- Speakers-Line Array
- Stage Rental
- Tour Guide System
- Truss Rental
- Walkie Talkie
- Microphones
- Projectors
- Cameras
- Video
- Lights
- LEDs
- Computers
- Services
Da-lite Screen Repair

Required Parts To Repair Da-Lite
You will need the following parts before proceeding the repair.
Mallet/hammer (optional)
Part 45766 (Anchor nut, .156 long, zinc 1 0.94)
Part 57923 Spring button assy., handle/tube 2 3.40
A Screw Driver
A wranch
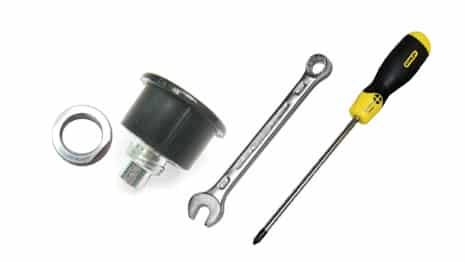
Dalite Screen Tool Kit
Step 1

Customer returned the screen with NO "spring button assembly" and NO "Anchor nut"
Step 2

I lifted the whole screen up, without the handle, and by using a screw driver, I secured the screen to the last hole of the outer tube (as shown in the picture).
Step 3

Then take a piece of a scotch tape and an anchor nut. Place the tape on the flat part of the anchor nut.
Step 4

Then paste the tape and the anchor nut on the part of the handle as shown in the picture.
Step 5

Move the handle assembly that had the anchor nut under the screen assembly as shown in the picture.
Step 6

Then slide the handle underneath the assembly as shown in the picture. Sometime it is hard to slide under. Use mallet to slide it in.
Step 7

Then insert the spring button assembly and screw it tight using a wranch